In InDesign, crafting well-formed documents will not only look better, but save you money in unexpected production costs.
l. Images. Before you place images in your file, make sure to first save them as CMYK TIFF files. The final resolution after sizing in InDesign should be 300 dpi. Select the linked file in the InDesign Links Panel, and in the link info, check the "Effective PPI" to see the resolution after sizing.
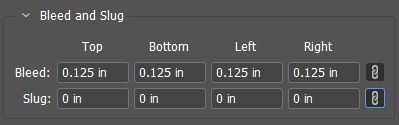
2. Bleed. If anything creeps over the edge on your page, you must assign Bleed in your document settings: File>Document Setup. I the bleed section, make sure all 4 boxes are at least .125 inches.
3. Colors. If you are doing four color process, it is important to manage your swatches. In your swatches pallet, change all spot colors to process and all RGB colors to CMYK.

4. Fonts. When you are typesetting and building your document, all fonts you are using must be active. Especially when you “Package” for output. One missing font can derail an entire project.

5. Effects. Yes InDesign will allow you to adjust transparency to an object. However, avoid doing so if adjusting color tint will suffice. This can help reduce rip time and streamline the production process.
6. Spell check. Must I even mention? Yet so many people skip this most critical and useful step.
There you have it. When you incorporate these 6 basics into your daily workout routine, your skills will become stronger, self-confidence will increase and you will greatly reduce the most common production problems.
GLOSSARY
Print the bleed or slug areas
Specify the bleed and slug areas in the Document Setup dialog box. The bleed and slug areas are discarded when the document is trimmed to its final page size. Objects outside the bleed or slug area (whichever extends farthest) are not printed.
About process colors
A process color is printed using a combination of the four standard process inks: cyan, magenta, yellow, and black (CMYK). Use process colors when a job requires so many colors that using individual spot inks would be expensive or impractical, as when printing color photographs.
Transparency effects
When you create an object in Adobe InDesign, by default it appears solid; that is, it has an opacity of 100%. You can apply effects to objects using opacity and blends. Overlap objects, add transparency to objects, or knock out shapes behind objects.
Perform a preflight check
Before printing or handing off the document to a service provider, you can perform a quality check on the document. Preflight is the industry-standard term for this process. The preflight utility warns of problems that may prevent a document or book from imaging as desired, such as missing files or fonts.